> ## Documentation Index
> Fetch the complete documentation index at: https://payperfax.mintlify.site/llms.txt
> Use this file to discover all available pages before exploring further.
# Step-by-Step Guide
> Complete instructions for sending a fax with PayPerFax
This guide walks you through every step of sending a fax using PayPerFax, from entering the destination number to receiving confirmation.
This process takes just a few minutes from start to finish.
## Overview of the web form
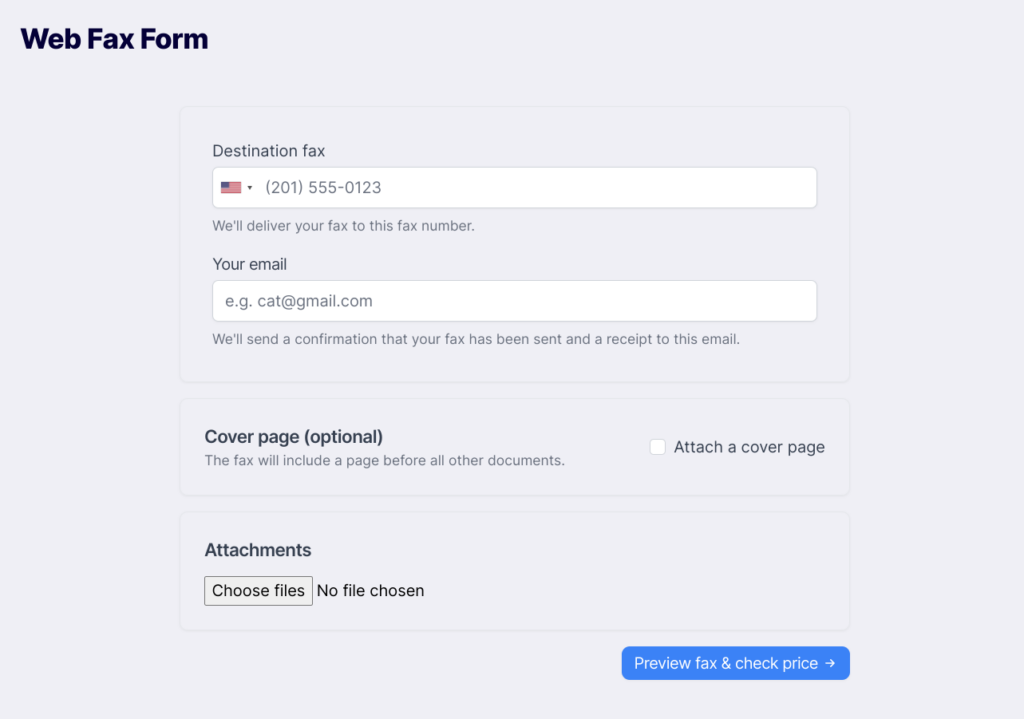
This is the basic PayPerFax web form where you'll enter your fax details:
 ## Step 1: Enter destination fax number and email
Click on the **flag icon** to select the country where you're sending the fax.
This ensures the proper country code and pricing.
Type the destination fax number including the area code.
Make sure to include the area code for domestic faxes.
Provide an email address where you'll receive:
* Fax completion notification
* Transmission details
* PDF copy of the sent fax
## Step 2: Optionally, compose a cover page
A cover page is an optional text page that appears before your attached documents. It's useful for routing instructions or messages to the recipient.
1. Click the **"Attach a cover page"** checkbox
2. Fill in the fields that appear:
## Step 1: Enter destination fax number and email
Click on the **flag icon** to select the country where you're sending the fax.
This ensures the proper country code and pricing.
Type the destination fax number including the area code.
Make sure to include the area code for domestic faxes.
Provide an email address where you'll receive:
* Fax completion notification
* Transmission details
* PDF copy of the sent fax
## Step 2: Optionally, compose a cover page
A cover page is an optional text page that appears before your attached documents. It's useful for routing instructions or messages to the recipient.
1. Click the **"Attach a cover page"** checkbox
2. Fill in the fields that appear:
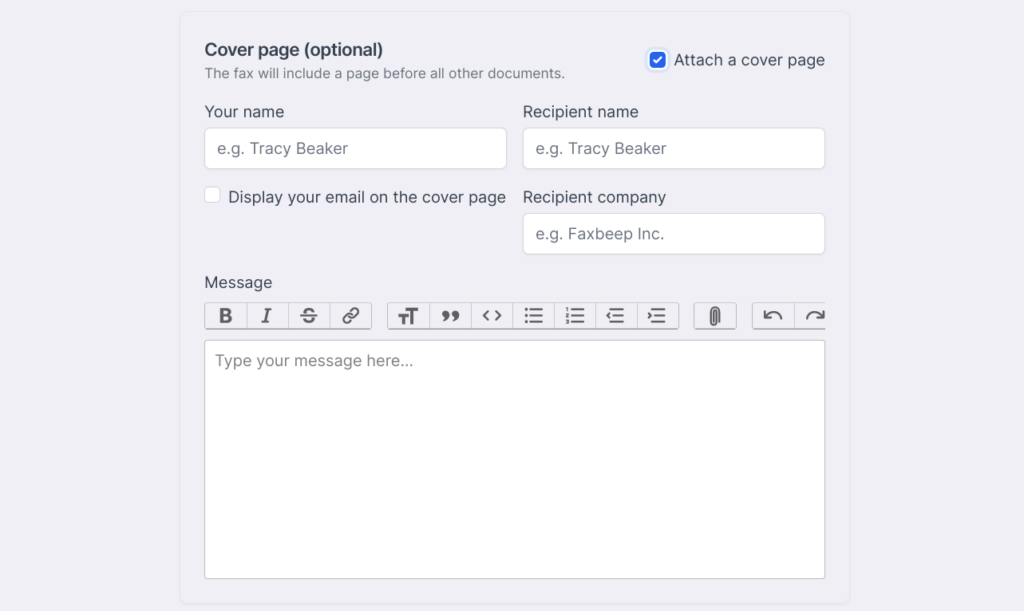 The cover page fields typically include:
* To (recipient name)
* From (your name)
* Company/organization
* Subject
* Message/notes
The cover page counts as **one page** toward your total page count and is included in the first 3 pages of the base price.
## Step 3: Optionally, attach files
Select one or more files from your computer to attach to the fax.
You can click "Choose files" multiple times to attach several documents.
They will be faxed in the order you added them.
**Accepted file types**: PDF, DOC, DOCX, TIF, JPEG
**Maximum file size**: 8MB per upload
Either a cover page **or** attached files (or both) must be provided to proceed. You cannot send a completely empty fax.
See [File Requirements](/sending-faxes/file-requirements) for detailed specifications.
## Step 4: Preview fax and check price
Click the **"Preview fax & check price"** button to proceed to the preview page.
PayPerFax will process your documents:
* Convert files to fax format (204×196 dpi)
* Count total pages
* Calculate the exact price
* Generate a preview of what will be sent
The cover page fields typically include:
* To (recipient name)
* From (your name)
* Company/organization
* Subject
* Message/notes
The cover page counts as **one page** toward your total page count and is included in the first 3 pages of the base price.
## Step 3: Optionally, attach files
Select one or more files from your computer to attach to the fax.
You can click "Choose files" multiple times to attach several documents.
They will be faxed in the order you added them.
**Accepted file types**: PDF, DOC, DOCX, TIF, JPEG
**Maximum file size**: 8MB per upload
Either a cover page **or** attached files (or both) must be provided to proceed. You cannot send a completely empty fax.
See [File Requirements](/sending-faxes/file-requirements) for detailed specifications.
## Step 4: Preview fax and check price
Click the **"Preview fax & check price"** button to proceed to the preview page.
PayPerFax will process your documents:
* Convert files to fax format (204×196 dpi)
* Count total pages
* Calculate the exact price
* Generate a preview of what will be sent
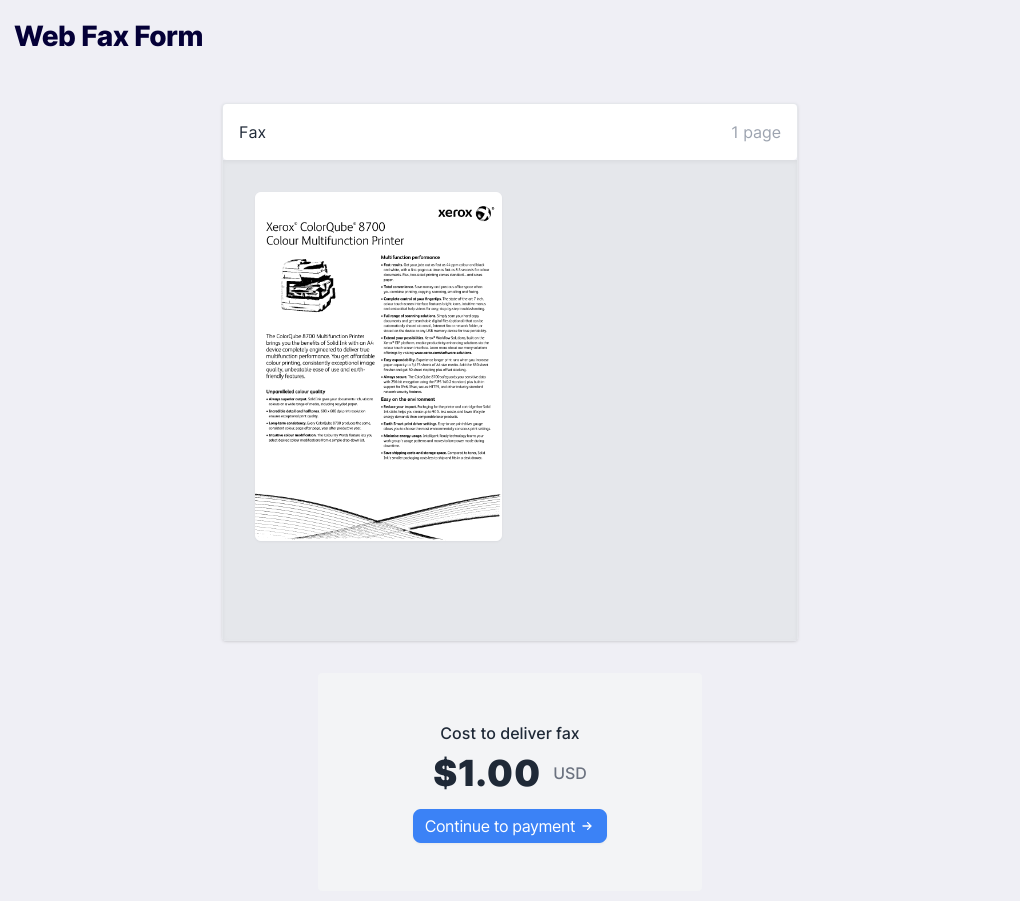 Preview processing takes 30-60 seconds. Please be patient while we prepare your fax.
Before proceeding to payment, verify:
* **All text is readable** - If the preview looks unreadable, the recipient won't be able to read it either
* **All pages are included** - Check for missing or unexpected blank pages
* **Page count is correct** - This determines your cost
* **Final price** - Guaranteed price with no hidden fees
The price shown is **guaranteed** - this is exactly what you'll pay if the fax succeeds.
**Pricing**: $2.00 for first 3 pages, $0.75 per additional page. Example: A 5-page fax = $2.00 + (2 × $0.75) = \$3.50. [See full pricing](/pricing)
## Step 5: Continue to payment
Click **"Continue to payment"** when you're satisfied with the preview.
Preview processing takes 30-60 seconds. Please be patient while we prepare your fax.
Before proceeding to payment, verify:
* **All text is readable** - If the preview looks unreadable, the recipient won't be able to read it either
* **All pages are included** - Check for missing or unexpected blank pages
* **Page count is correct** - This determines your cost
* **Final price** - Guaranteed price with no hidden fees
The price shown is **guaranteed** - this is exactly what you'll pay if the fax succeeds.
**Pricing**: $2.00 for first 3 pages, $0.75 per additional page. Example: A 5-page fax = $2.00 + (2 × $0.75) = \$3.50. [See full pricing](/pricing)
## Step 5: Continue to payment
Click **"Continue to payment"** when you're satisfied with the preview.
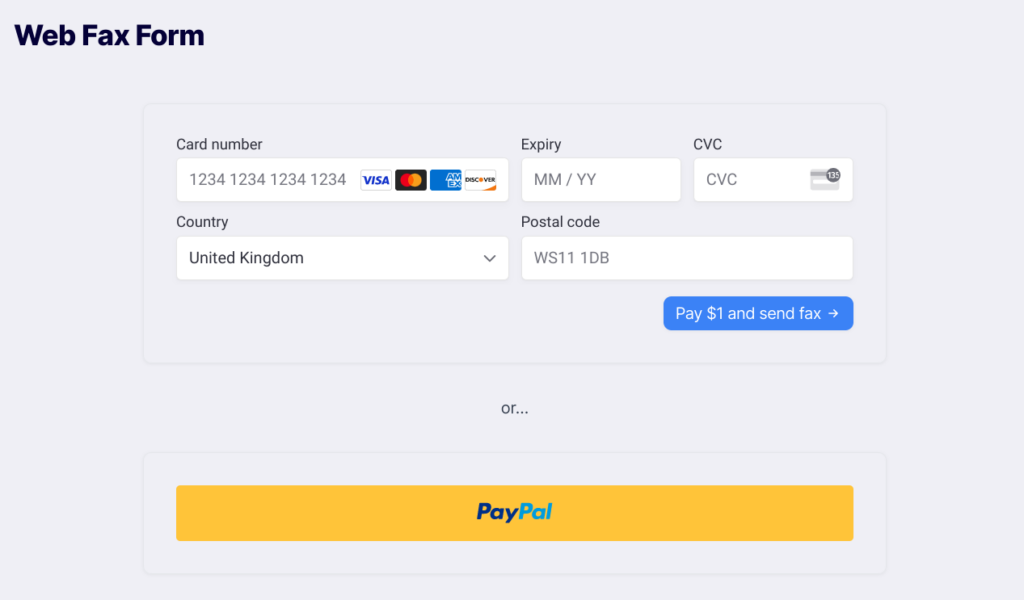 **Credit Card**:
* Enter card details directly on the page
* Secure processing via Stripe
**PayPal**:
* Click the PayPal button
* Log into your PayPal account
* Approve the payment
A temporary authorization hold is placed on your payment method. You're only charged if the fax succeeds. [Learn more](/pricing/pricing).
## Step 6: Track your fax
After payment authorization, you'll see the tracking page.
**Credit Card**:
* Enter card details directly on the page
* Secure processing via Stripe
**PayPal**:
* Click the PayPal button
* Log into your PayPal account
* Approve the payment
A temporary authorization hold is placed on your payment method. You're only charged if the fax succeeds. [Learn more](/pricing/pricing).
## Step 6: Track your fax
After payment authorization, you'll see the tracking page.
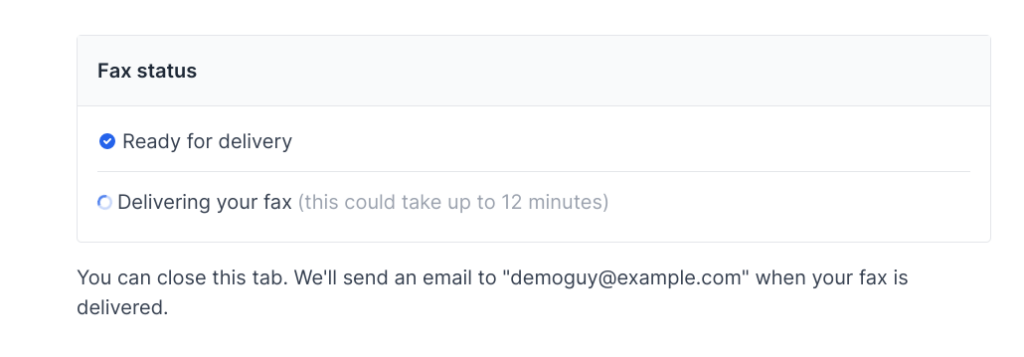 The tracking page shows real-time status:
* **Queued**: Waiting to be sent
* **Sending**: Currently transmitting
You don't need to stay on this page. A confirmation email will be sent when complete.
The tracking page shows real-time status:
* **Queued**: Waiting to be sent
* **Sending**: Currently transmitting
You don't need to stay on this page. A confirmation email will be sent when complete.
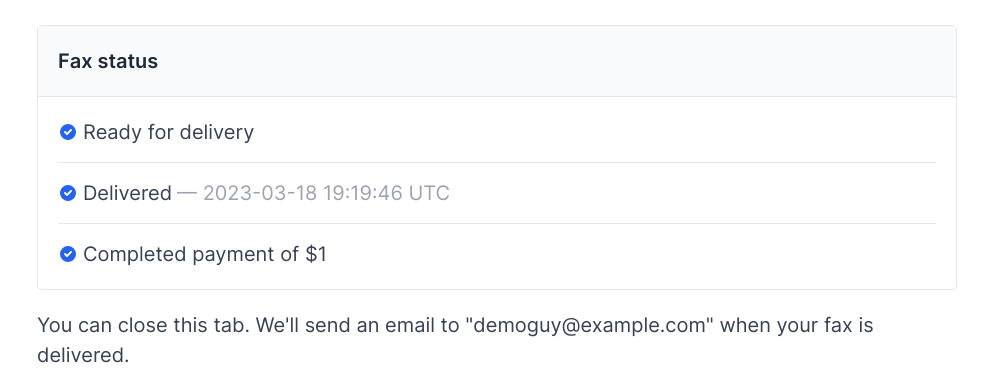 The page updates to show:
* Final status (success or failure)
* Transmission date and time
* Destination fax identifier (CSID)
* Link to view/download confirmation
## Step 7: Receive confirmation via email
When your fax completes, you'll receive an email confirmation with:
The page updates to show:
* Final status (success or failure)
* Transmission date and time
* Destination fax identifier (CSID)
* Link to view/download confirmation
## Step 7: Receive confirmation via email
When your fax completes, you'll receive an email confirmation with:
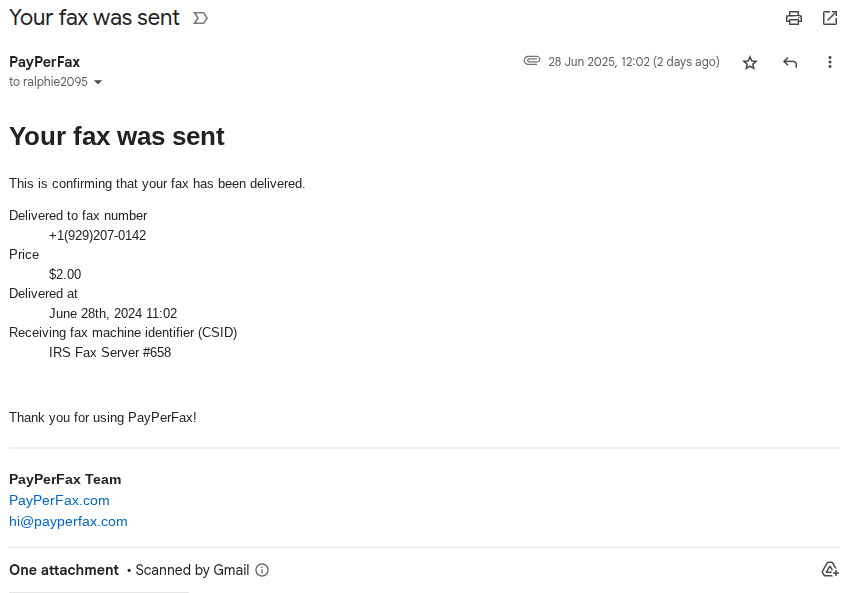 * Date and time sent
* Destination fax number
* Remote fax identifier (CSID)
* Number of pages
* Final charge amount
Exact copy of what was sent to the recipient
Save this for your records
## What if something goes wrong?
Understand why faxes fail and what to do
Your fax shows as sent but recipient didn't get it
Why fax confirmations appear pixelated
How to resend a failed fax
## Related topics
Fax from [Dropbox](/features/dropbox-integration) or [Google Drive](/features/google-drive-integration)
How to use cover pages effectively
Supported formats and specifications
Complete pricing information
* Date and time sent
* Destination fax number
* Remote fax identifier (CSID)
* Number of pages
* Final charge amount
Exact copy of what was sent to the recipient
Save this for your records
## What if something goes wrong?
Understand why faxes fail and what to do
Your fax shows as sent but recipient didn't get it
Why fax confirmations appear pixelated
How to resend a failed fax
## Related topics
Fax from [Dropbox](/features/dropbox-integration) or [Google Drive](/features/google-drive-integration)
How to use cover pages effectively
Supported formats and specifications
Complete pricing information